The Secret To Get Perfect Hard Boiled Eggs Every Time (So They’re Actually Easy to Peel)
Whether you need a quick protein-filled snack or the base for a classic egg salad, knowing how to boil an egg correctly is a fundamental kitchen skill. Many people struggle with shells that stick or yolks that turn a strange color, but these issues are completely avoidable with the right technique. By following a few simple steps, you can ensure your eggs are easy to handle and look beautiful on the plate every single time.
ADVERTISEMENT
The Secret To Get Perfect Hard Boiled Eggs Every Time (So They’re Actually Easy to Peel)
The goal of a perfect hard-boiled egg is a tender white and a bright, creamy yellow center. Most importantly, you want the shell to glide right off without taking chunks of the egg with it. This guide focuses on gentle temperature changes and precise timing to give you professional results at home.
ADVERTISEMENT
Helpful Strategies for Flawless Results
Getting the best results starts before you even turn on the stove. These professional tips will help you avoid common mistakes and make the peeling process much smoother.
ADVERTISEMENT
Select the Right Eggs It is actually better to “Use Older Eggs” when you plan on boiling them. Fresh eggs are wonderful for poaching or frying, but they are a “nightmare when it comes to peeling” because the white sticks tightly to the inner membrane. Eggs that have been in your refrigerator for about a week have a higher pH level, which naturally helps the shell separate from the egg after cooking.
Prepare the Water You can “Add Vinegar to the Water” to act as a safety net. About 1 tablespoon of white vinegar in the pot can help the egg whites firm up quickly if a shell happens to crack during the process. It also helps to slightly break down the calcium in the shell, which makes “the peeling process” much less frustrating.
Temperature Management To keep your shells intact, you should “Avoid the Cold Fridge-to-Pot Shock” that often causes cracking. If you take an egg straight from a cold refrigerator and drop it into boiling water, the sudden change in temperature often causes the shell to burst. Letting your eggs sit on the counter for about 10/15 minutes helps them warm up slightly for a more even cook.
Mastering the Cooking Time
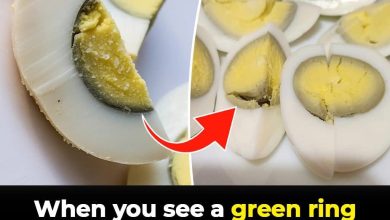
The internal texture of your egg depends entirely on how long it stays in the heat. You must “Watch the Timer” carefully because even one extra minute can change the result. If you “overcook the eggs and you’ll end up with a greenish ring around the yolk,” which is a sign that the sulfur in the egg has reacted poorly to the high heat.
-
For Medium Eggs: Cook for 8/9 minutes for a firm white and a solid yolk.
-
For Large Eggs: Aim for 9/10 minutes to ensure the center is fully set.
-
For Creamy Centers: Pull them out at the 8 minute mark if you prefer a yolk that isn’t quite so dry.
The Importance of the Cooling Bath
The most vital step happens the moment the timer goes off. You must “Chill in Ice Water Immediately” to get the best texture. By moving the eggs into a bowl of very cold water, you stop the residual heat from cooking the yolk further. This “rapid cooling stops the cooking process” and causes the egg to contract slightly inside the shell, creating a small space that makes peeling effortless.
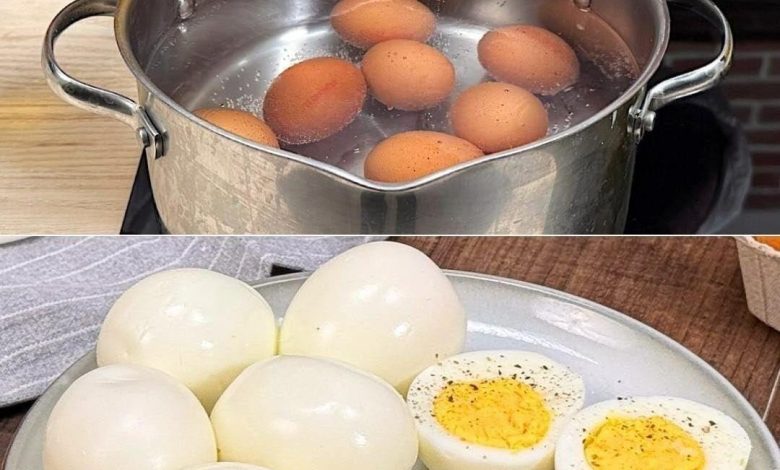
Should You Start Boiled Eggs in Hot or Cold Water?
There is often a debate about whether to drop eggs into water that is already bubbling or to let them heat up with the water. For the most reliable and consistent results, starting with cold water is the best path.
When you start with cold water, the temperature rises slowly. This “gradual heating helps the eggs cook more evenly” and prevents the delicate shells from breaking. If you start with water that is already at a rolling boil, the eggs may bounce around and crack, or the outside will be rubbery before the inside is finished. For a smooth, stress-free experience, place your eggs in the pot first, cover them with cool water, and then turn on the heat.