My great grandmother relied on this simple 3 ingredient bake when the pantry was bare. A depression era staple that kept families fed, it is dense, fi
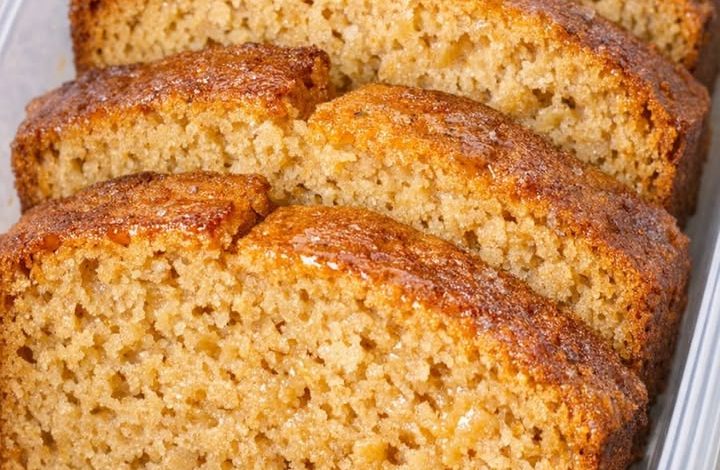
This 3-Ingredient Peanut Butter Bread recipe is an incredible showcase of lipid-protein matrix dispersion and high-density starch hydration. Unlike traditional quick breads, this formulation completely bypasses chemical leaveners (like baking powder) and added sucrose, relying instead on the intense concentration of emulsified plant proteins and fats native to creamy peanut butter. When gently warmed with whole milk and folded into all-purpose flour, the fats encapsulate the wheat proteins, heavily restricting gluten development. The result is a highly efficient, dense, rustic loaf that sets into a sturdy, moisture-locked crumb during its 350°F bake.
ADVERTISEMENT
3-Ingredient Peanut Butter Bread
Ingredients:
| Ingredient | Quantity |
| All-purpose flour | 2 / cups |
| Creamy peanut butter | 1 / cup |
| Whole milk (divided) | 1 3/4 / cups |
Step-by-Step Directions:
Step 1: The Lipid Matrix Loosening: Preheat your oven to 350°F and lightly grease a standard 9×5-inch loaf pan with oil, butter, or grease. In a medium saucepan or sturdy bowl, combine the peanut butter with 1 / cup of the whole milk. Warm very gently over low heat for a few minutes, stirring constantly until the mixture loosens into a smooth, uniform, and pourable emulsion.
ADVERTISEMENT
Tip: Gently warming the peanut butter with the initial liquid is a vital structural requirement. Cold or room-temperature peanut butter is a highly viscous, sticky paste because its proteins and fats are tightly bound. Introducing warm milk breaks those intermolecular bonds, turning it into a fluid phase that can actually disperse evenly into the flour without forming dense, unmixable paste pockets.
ADVERTISEMENT
Step 2: The Starch Integration well: Measure the all-purpose flour into a large mixing bowl. Create a deep well in the exact center of the flour mound and pour the warm, liquid peanut butter and milk mixture straight into the cavity.
Step 3: The Phase-Adjustment Hydration: Add the remaining 3/4 / cup of whole milk a tiny splash at a time, stirring steadily with a wooden spoon or a sturdy fork. Work the ingredients together until a thick, heavy, and completely moistened dough forms.
Note: The batter should look quite rustic, dense, and thick—similar to a drop-biscuit dough. Ensure you scrape the absolute bottom of the bowl so no dry, white pockets of flour remain hidden in the center of the mass.
Step 4: The Geometric Pan Compress: Scrape the heavy batter into your prepared 9×5-inch loaf pan. Use the back of a large spoon to firmly press the sticky dough into the absolute corners of the pan, smoothing out the top surface into a relatively level plane.
Step 5: The Thermal Setting Bake & Rest: Bake on the center oven rack for 45/55 minutes until the crust takes on a deep golden-bronze hue and feels firm when lightly pressed. A skewer inserted into the center should come out clean. Remove from the oven and let the loaf rest undisturbed inside its pan for 10/15 minutes.
Tip: The resting phase is an essential lipid-settling milestone. As the hot bread cools slightly, you will notice a fine, glossy sheen of natural peanut oil rise to the surface. Allowing the loaf to rest in the pan forces the crumb to gradually re-absorb these escaping fats, which is the exact chemical trick that keeps this leavener-free bread incredibly moist and tender rather than dry and chalky.
Step 6: The Low-Temperature Crumb Lock: Carefully invert the loaf pan to turn the bread out onto a wire cooling rack. Let it sit until it is just barely warm before attempting to slice it.
Note: Waiting for the bread to cool down ensures the dense starch network locks in place. Slicing into it while it is screaming hot will cause the heavy, moist crumb to tear and tear apart under the knife.