Grandma’s Polish Cookies
Grandma’s Polish Cookies hold a special place in the hearts of many. These delectable treats, passed down through generations, are not just cookies; they are a piece of family history. In this article, we will take you on a journey to discover the secrets behind Grandma’s Polish Cookies. From the essential ingredients to the heartwarming preparation process, we will uncover the magic of these beloved cookies. So, put on your apron and get ready to create memories in the kitchen.
ADVERTISEMENT
| Ingredient | Quantity |
|---|---|
| Flour | 4 cups |
| Unsalted Butter | 2 sticks (cold and cubed) |
| Kosher Salt | 1 teaspoon |
| Large Egg Yolks | 4 |
| Evaporated Milk | 8 oz |
| Vanilla Extract | 2 teaspoons |
| Oil for Frying | Vegetable oil (for frying) |
| Powdered Sugar | For dusting |
Flour: The Foundation of Grandma’s Polish Cookies
Grandma’s Polish Cookies start with 4 cups of flour. This ingredient serves as the foundation of the dough, providing the perfect texture and structure. It’s essential to use high-quality flour for the best results.
ADVERTISEMENT
Butter: The Secret to Richness
Two sticks of unsalted butter, cold and cubed, are another crucial component. The cold butter, when cut into the flour, creates a crumbly texture that melts in your mouth. The absence of salt in the butter allows you to control the cookie’s overall saltiness.
ADVERTISEMENT
The Flavor Enhancers: Salt and Vanilla
To balance the sweetness, add 1 teaspoon of kosher salt for that perfect sweet-savory contrast. Two teaspoons of vanilla extract bring a delightful aroma and depth of flavor to Grandma’s Polish Cookies.
The Binding Agents: Egg Yolks and Evaporated Milk
Four large egg yolks provide richness and structure to the dough. When beaten until foamy, they create a light and airy texture. Eight ounces of evaporated milk add moisture and creaminess to the mixture.
Oil for Frying: Achieving Crispy Perfection
To fry these cookies to golden perfection, you’ll need vegetable oil. Heating 1-2 inches of oil in an electric skillet or deep frying pan is the key to achieving that satisfying crunch.
The Sweet Finish: Powdered Sugar
To complete the masterpiece, dust the fried cookies with powdered sugar. This final touch adds a delightful sweetness and a touch of elegance.
Crafting Grandma’s Polish Cookies
Mixing and Kneading
Begin by combining the flour and salt in a large bowl. Cut in the cold, cubed butter until the mixture becomes crumbly. In a separate bowl, beat the egg yolks until foamy, then add the evaporated milk and vanilla extract. Combine this egg mixture with the flour mixture and stir until a dough forms.
Transfer the dough to a clean, lightly floured surface and knead it for about 30 seconds. Divide the dough into four even sections.
Shaping and Frying
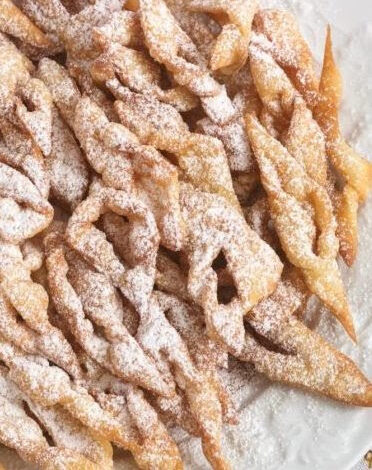
Roll each section into a rectangle shape, approximately ¼-inch thick. Cut the dough into four 1 ½ inch strips. Now, here comes the unique twist that gives Grandma’s Polish Cookies their distinctive appearance: cut a 2-inch slit lengthwise down the middle of each strip, then draw one of the ends through the slit to create a charming bow shape.
Heat 1-2 inches of vegetable oil in an electric skillet or deep frying pan. Fry the strips of dough in small batches until they turn a beautiful golden brown. As you remove them from the oil, place the fried strips on a plate lined with a paper towel to remove excess oil. Finally, dust them generously with powdered sugar. Repeat this process until all of the dough has been fried and sprinkled with powdered sugar.
The Experience of Making Grandma’s Polish Cookies
Creating Grandma’s Polish Cookies is more than a culinary endeavor; it’s a journey back in time. As you knead the dough, shape the cookies, and savor their aroma while frying, you connect with the traditions and memories of generations past. These cookies are not just a sweet treat; they are a bridge to the past, a testament to the love and care that goes into family recipes.
FAQs
Q: Are Grandma’s Polish Cookies difficult to make? A: Not at all! While they may seem intricate, with a bit of patience and following the steps, you can master these cookies even if you’re not an experienced baker.
Q: Can I use salted butter instead of unsalted? A: It’s best to use unsalted butter to have better control over the cookie’s saltiness. If you only have salted butter on hand, you can reduce the amount of added salt in the recipe slightly.
Q: How long do Grandma’s Polish Cookies stay fresh? A: When stored in an airtight container, these cookies can stay fresh for up to a week. However, their delightful taste and texture are at their prime in the first few days after baking.
Q: Can I freeze Grandma’s Polish Cookies? A: Yes, you can freeze these cookies for longer storage. Place them in an airtight container or freezer bags, separating layers with parchment paper to prevent sticking. They can be frozen for up to three months.
Q: What occasions are perfect for serving Grandma’s Polish Cookies? A: These cookies are versatile and perfect for various occasions. They make excellent treats for holiday gatherings, family reunions, or simply as a sweet indulgence with your afternoon tea or coffee.
Q: Can I customize Grandma’s Polish Cookies with additional flavors or toppings? A: Absolutely! While the classic recipe is delightful, you can add a personal touch by incorporating ingredients like cinnamon, lemon zest, or even chocolate chips into the dough. Experiment and make Grandma’s Polish Cookies your own!
Grandma’s Polish Cookies are more than just a dessert; they are a cherished tradition, a connection to the past, and a delightful treat for any occasion. With their unique bow-shaped design and irresistible flavor, these cookies have a special place in the hearts and homes of many. So, gather your ingredients, follow the steps, and create your own batch of Grandma’s Polish Cookies to share with loved ones. It’s a sweet journey worth taking.