Found this in my mother’s church cookbook from the ladies auxiliary and it disappeared at Easter dinner
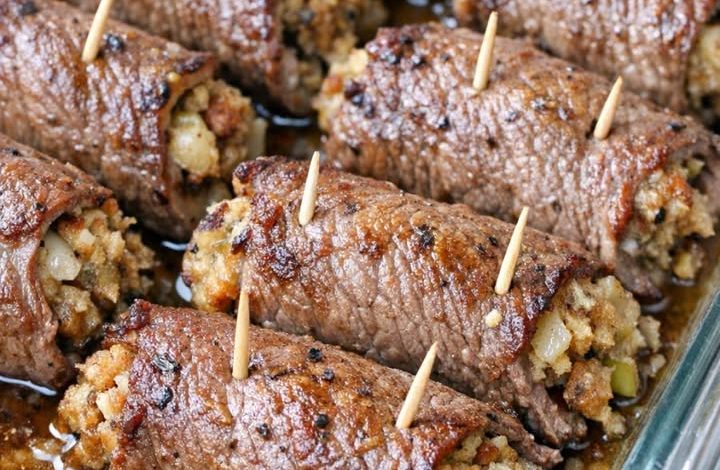
This Oven Baked Beef Roll Ups recipe is a magnificent, nostalgic comfort food masterpiece straight from the pages of classic heritage church cookbooks. By wrapping paper-thin, tender slices of beef round steak around a savory, herb-seasoned stuffing core and baking them beneath a velvety canopy of condensed cream of mushroom soup and rich beef broth, you create an incredibly deep flavor matrix. As it bakes, the beef gently braises in its own juices, thinning the mushroom cream into an elite, luxurious gravy that seeps into the stuffing layers. It is an exceptionally high-reward, single-pan dinner that delivers premium, old-school comfort with minimal active kitchen maintenance.
ADVERTISEMENT
Oven Baked 5-Ingredient Church Cookbook Beef Roll Ups
Ingredients:
| Ingredient | Quantity |
| Thin-sliced beef round steak or top round (1/4 / inch thick) | 1 1/2 / pounds |
| Seasoned stuffing mix (such as herb-flavored) | 1 / box (6 / ounces) |
| Low-sodium beef broth (divided) | 1 1/2 / cups |
| Condensed cream of mushroom soup | 1 / can (10.5 / ounces) |
| Unsalted butter (melted, plus extra for greasing) | 2 / tablespoons |
Step-by-Step Directions:
Step 1: Ignite the Oven Heat: Preheat your oven to 350°F. Lightly grease the interior walls and bottom floor of a standard 9×13-inch glass baking dish with a thin rub of butter to prevent sticking and guarantee easy cleanup.
ADVERTISEMENT
Step 2: Hydrate the Savory Stuffing Core: In a medium mixing bowl, combine your 6- / ounce box of dry seasoned stuffing mix with 1 cup of the low-sodium beef broth and your 2 / tablespoons of melted unsalted butter. Stir the components together steadily until the liquid lipids are fully absorbed and the stuffing crumbs are uniformly moistened. It should feel soft enough to compress easily with your fingers without turning mushy or wet.
ADVERTISEMENT
Step 3: Flatten the Protein Canvas: Lay your beef round slices flat out across a large cutting board or clean work surface. If any sections appear bulbous, thick, or uneven, drape a sheet of plastic wrap over the meat and use a meat mallet or the bottom of a heavy skillet to gently pound the fibers down until they reach a uniform 1/4- / inch thickness so they roll flawlessly.
Step 4: Layer the Filling: Divide your hydrated stuffing mixture completely evenly among the flattened beef slices. Form the stuffing into a compact, small log shape and nestle it near one of the short ends of each beef piece, leaving a brief border clear around the outer edges so the stuffing doesn’t squeeze out sideways.
Step 5: Roll and Secure the Bundles: Starting at the short end holding the stuffing log, roll each beef slice up snugly around the filling, tucking in the sides slightly as you progress. Pierce each roll crosswise with 1 to 2 clean wooden toothpicks to firmly lock the overlapping flaps in place.
Step 6: Arrange the Rolls: Lay the stuffed beef bundles seam-side down in a single layer flat across the bottom of your prepared glass baking dish. Nestle the rolls fairly close against one another; packing them tightly traps the internal steam, keeping the stuffing exceptionally moist while forming a beautiful pooling area for the gravy.
Step 7: Whisk the Mushroom Canopy: In a separate small bowl, combine your 10.5- / ounce can of condensed cream of mushroom soup with the remaining 1/2 / cup of low-sodium beef broth. Whisk the two elements together vigorously until the mixture is uniform and completely free of lumps, then pour this velvety sauce evenly over and around the nested beef roll ups.
Step 8: The Covered Braise Phase: Seal the mouth of the glass baking dish tightly with a sheet of premium aluminum foil to lock in every drop of moisture. Slide the pan onto the center rack of your preheated oven and bake undisturbed for 45 / minutes, allowing the beef fibers to gently braise and soften in the steaming broth.
Step 9: The Uncovered Roast Finish: Carefully peel back and discard the hot foil sheet. Return the uncovered baking dish straight to the oven to bake for an additional 20 / to 25 / minutes. Keep a close eye on your visual indicators: the dish is fully cooked when the beef is melt-in-your-mouth tender, the exposed top crowns of the roll ups show a gorgeous golden-brown finish, and the surrounding mushroom gravy is bubbling aggressively.
Step 10: Rest, Pull, and Serve Warm: Remove the sizzling dish from the oven and let it sit completely undisturbed on the counter for 5 / to 10 / minutes to let the hot juices settle back into the meat. Gently twist and pull out all the wooden toothpicks before serving. Platter the roll ups, spoon generous amounts of the hot mushroom pan gravy over the top canopy, and serve immediately!