Grandma Ruth whipped up this 4 ingredient masterpiece every Sunday after church. It is so ridiculously easy to make and the entire pan disappears in m
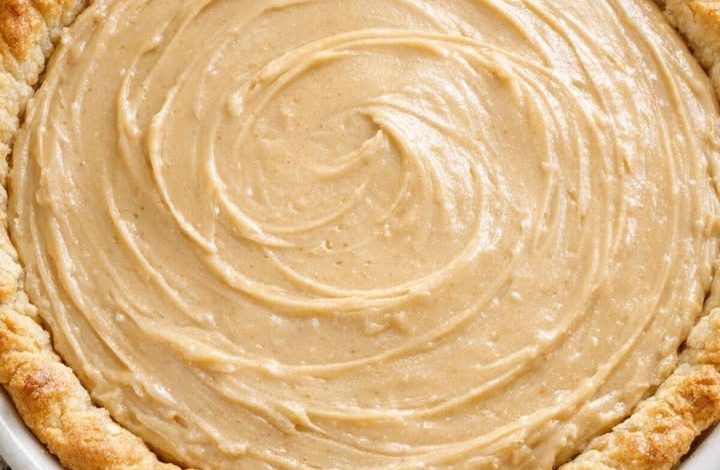
This Amish Peanut Butter Pie is a magnificent, old-fashioned dessert masterpiece that achieves pure, decadent luxury using incredibly humble pantry staples. By splitting a sweet, crumbly peanut butter and powdered sugar mixture into two roles, this recipe performs a brilliant culinary double-duty. Half of the crumbs form a pebbly, melt-in-your-mouth foundation at the bottom of a flaky, blind-baked pastry shell, while the rest is whisked with whole milk into a silk-smooth, custard-like canopy. After a patient chill in the refrigerator, it transforms into an exceptionally high-reward dessert that balances a rich, nutty flavor with an elite, velvety texture.
ADVERTISEMENT
Old-Fashioned Amish Peanut Butter Pie
Ingredients:
| Ingredient | Quantity |
| The Pastry Shell: | |
| 9-inch pie crust (unbaked or refrigerated) | 1 / unit |
| The Luxury Filling Matrix: | |
| Creamy peanut butter | 1 / cup |
| Powdered sugar (plus extra for dusting if desired) | 1 / cup |
| Whole milk | 1 1/2 / cups |
Step-by-Step Directions:
Step 1: Prep and Blind-Bake the Pastry: Preheat your oven to 375°F. Fit your unbaked pie crust gently into a 9-inch ceramic pie plate, pressing it snugly against the bottom and sides. Crimp the top edges decoratively, then prick the bottom of the dough all over with the tines of a fork to prevent air pockets from pocketing up. Line the crust with parchment paper, fill it to the brim with pie weights, dried beans, or raw rice, and bake for 12 / to 15 / minutes until the edges turn pale golden.
ADVERTISEMENT
Step 2: Dry the Crust Bottom: Carefully lift the weights and parchment liner out of the pie shell. Return the naked crust to the oven for an additional 8 / to 10 / minutes until the bottom layer looks dry, firm, and beautifully golden-brown. Set the pie plate on a wire rack to cool down completely before adding any contents.
ADVERTISEMENT
Step 3: Mash the Peanut Butter Crumbs: In a medium-sized mixing bowl, combine the 1 cup of creamy peanut butter and 1 cup of powdered sugar. Use a sturdy spatula or a fork to mash, press, and stir the components together vigorously. Continue until the sugar is fully integrated into the nut oils, leaving you with a completely unified, crumbly texture with zero visible streaks of white powder.
Step 4: Build the Pebbly Foundation Layer: Scoop out exactly half of your peanut butter and powdered sugar crumb mixture and sprinkle it evenly across the bottom of your cooled pie crust. Use your fingertips to gently break apart any massive clumps, spreading it out into an even, pebbly layer. This raw crumb layout is the ultimate secret to achieving that classic, signature Amish texture in every bite.
Step 5: Whisk the Silk Canopy: Pour the 1 1/2 / cups of whole milk directly into the same mixing bowl containing the remaining half of your peanut butter crumbs. Start whisking slowly to avoid splashing the liquid, then accelerate into a vigorous whisking motion. Continue beating until the peanut butter crumbs dissolve completely into the milk, resulting in a smooth, fluid filling with absolutely zero lumps.
Step 6: Pour, Level, and Set: Carefully pour the liquid peanut butter filling over the crumb layer inside your baked crust. Do not worry if a few loose crumbs float up to the surface. Gently tap the ceramic plate flat against your kitchen counter a few times to force out trapped air bubbles and level the surface canopy cleanly.
Step 7: The Overnight Refrigeration Rest: Transfer the pie uncovered straight into the refrigerator. Let it chill undisturbed for at least 4 / hours until the fluid matrix firms up and slices cleanly. For the absolute best results and a true Sunday-style farmhouse texture, let it chill overnight so the flavors can fully meld together.
Step 8: Dust, Slice, and Serve: Just before serving, give the top of the pie a light, decorative dusting of extra powdered sugar for an old-fashioned aesthetic. Press a sharp knife down through the layers to slice, wiping the blade completely clean with a towel between each cut to ensure flawless, restaurant-quality presentation. Serve cold straight from the fridge!