I love to making this when we have company. It’s always popular with kids but grown-ups love it too, especially with a cup of coffee!
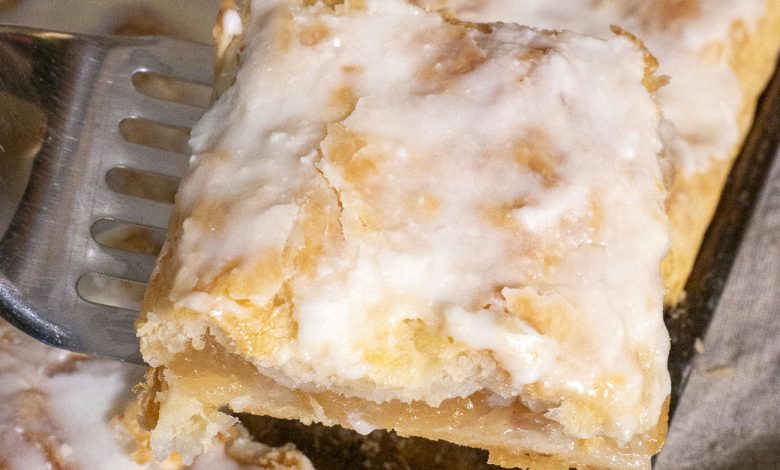
This Chicago-Style Bakery Apple Slices recipe is an absolute legendary midwestern classic! If you’ve ever walked into a traditional Polish or Italian bakery in Chicago, you’ve likely seen these giant, beautiful sheets of glazed pastry sliced into neat, handheld squares. It gives you all the magnificent flavor of a traditional apple pie but with a much higher crust-to-filling ratio and a sweet, donut-style glaze that hardens on top. By grating chilled butter straight into the flour, you guarantee an incredibly flaky, layered pastry base that holds up perfectly when sliced into squares.
ADVERTISEMENT
Chicago-Style Bakery Apple Slices
Ingredients:
| Ingredient | Quantity |
| For the Pie Dough: | |
| All-purpose flour | 4 / cups |
| Granulated sugar | 1 / tablespoon |
| Salt | 1 / teaspoon |
| Unsalted butter (chilled) | 1 1/4 / cups (2 1/2 sticks) |
| Ice water (plus extra as needed) | 1/2 / cup |
| For the Filling: | |
| Apple pie filling (canned or homemade) | 4 / cups |
| For the Glaze: | |
| Powdered sugar | 1 / cup |
| Unsalted butter (softened) | 2 / tablespoons |
| Vanilla extract | 1 / teaspoon |
| Whole milk | 2 / tablespoons |
Step-by-Step Directions:
Step 1: Mix the Pastry Base: In a large mixing bowl, stir together the all-purpose flour, granulated sugar, and salt until unified.
ADVERTISEMENT
Step 2: Grate the Chilled Butter: Remove your chilled butter from the fridge one stick at a time. Using a standard box cheese grater, grate the firm butter directly over the flour mixture, giving the flour a quick stir between sticks to keep the butter shards separate.
ADVERTISEMENT
A Friendly Kitchen Note: If the butter starts to soften too much from the heat of your hands while grating, simply pop it into the freezer for a few minutes to firm back up. Alternatively, you can use a knife to cut the cold butter into tiny cubes and work it into the flour using a pastry blender or two forks until it resembles coarse crumbs with visible pea-sized butter bits throughout.
Step 3: Hydrate and Chill the Dough: Create a small well in the center of your flour mixture and pour in the 1/2 / cup of ice water. Use a fork to quickly toss the mixture together. Drizzle in extra cold water 2 / tablespoons at a time, stirring gently after each addition, just until the dough starts to hold together easily without being sticky. Turn the dough out onto a lightly floured surface, gently knead it a few times to bring it together, and split it into two equal halves. Flatten each half into a 1-inch thick rectangle, wrap tightly in plastic, and chill in the fridge for at least 30 / minutes.
Step 4: Roll and Layer the Bottom Crust: Preheat your oven to 400°F and set aside a 9×13-inch jelly roll pan or rimmed baking sheet. Lightly dust your work surface with flour, grab your first chilled dough rectangle, and roll it out until it matches the rough dimensions of your pan. Carefully lift and press this bottom crust flat into the floor of the baking sheet, then spread your 4 / cups of apple pie filling into an even layer across the dough.
Step 5: Top and Bake: Roll out the second rectangle of dough to the same size. Carefully drape it over the top of the apple layer (rolling the dough loosely around your rolling pin makes transferring it incredibly easy!). Pinch the outer edges of the top and bottom dough sheets together to seal. Slice a few small slits across the top crust with a sharp knife to vent steam, then slide the pan onto the center rack. Bake for 40 / minutes, rotating the pan halfway through the window, until the pastry is a beautiful golden brown. Transfer the pan to a wire rack to cool completely.
Step 6: Glaze, Harden, and Slice: Once the pastry sheet has cooled down to room temperature, prepare your glaze. In a medium bowl, beat together the powdered sugar, softened unsalted butter, vanilla extract, and whole milk until completely smooth and pourable. Spread the glaze evenly over the top of the golden crust using an offset spatula. Let the pan sit undisturbed until the glaze completely sets and hardens into a crackly white shell, then slice into neat squares and serve!