Put solid unthawed frozen unwrapped ice cream sandwiches in the oven-safe baking dish and 3 other everyday items to get a dessert so delicious your fa
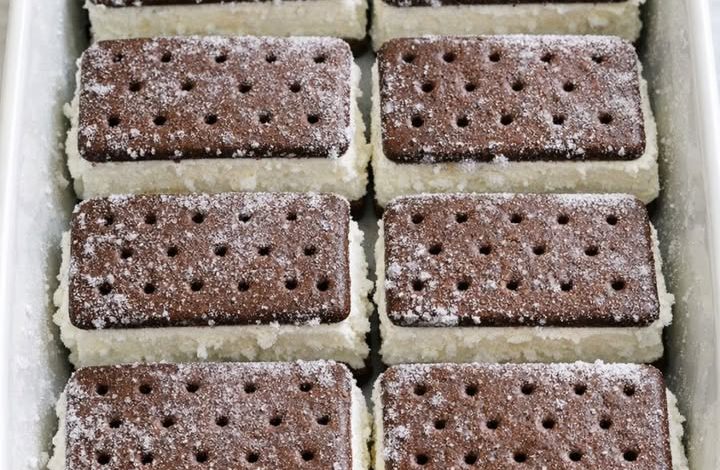
This 4-Ingredient Oven Baked Ice Cream Sandwich Dessert is a masterclass in thermal-contrast assembly and viscosity transformation. By subjecting frozen ice cream sandwiches to a short, high-heat interval at 350°F, you initiate a controlled phase change: the external “cookie” layers absorb the chocolate syrup, while the internal ice cream transitions into a thick, custard-like state. The frozen whipped topping acts as a thermal insulator, protecting the ice cream from liquefying completely while its own proteins puff and stabilize, resulting in a warm, spoonable “bread pudding” texture made entirely from frozen staples.
ADVERTISEMENT
4-Ingredient Oven Baked Ice Cream Sandwich Dessert
Ingredients:
| Ingredient | Quantity |
| Ice cream sandwiches (standard size) | 12 |
| Chocolate syrup (divided) | 1 cup |
| Frozen whipped topping (thawed) | 1 tub (8 oz) |
| Mini chocolate chips | 1 cup |
Step-by-Step Directions:
Step 1: The Foundation Layering: Preheat oven to 350°F. Arrange the solid, unthawed ice cream sandwiches in a single layer in a greased 9×13-inch dish.
ADVERTISEMENT
Tip: Keeping the sandwiches solidly frozen until the moment they enter the oven is a vital mechanical step. This ensures they have enough “thermal mass” to withstand the bake without turning into a flat puddle of milk, allowing the dessert to maintain its distinct sandwich “blocks” within the creamy sauce.
ADVERTISEMENT
Step 2: The Syrup Infusion: Drizzle 1/2 cup of the chocolate syrup over the sandwiches, allowing it to pool in the gaps.
Tip: The chocolate syrup acts as a hydration agent for the sandwich cookies. As the heat rises, the dry, cocoa-based cookies pull the syrup inward, preventing them from becoming tough or chewy in the oven and instead creating a melt-in-your-mouth cake texture.
Step 3: The Thermal Insulation: Spread the thawed whipped topping evenly over the sandwiches and sprinkle with mini chocolate chips.
Tip: Using whipped topping rather than real whipped cream is a structural necessity. Whipped topping contains stabilizers that allow it to “puff” and hold its shape under heat, whereas real cream would simply melt and vanish into the ice cream.
Step 4: The Controlled Bake: Bake for 15/20 minutes.
Note: The dessert is finished when the whipped topping edges look slightly aerated and the chocolate chips have achieved a glossy, softened sheen.
Step 5: The Viscosity Set: Let the dish rest for 5/10 minutes before drizzling with the remaining syrup and serving.
Tip: This rest is a “viscosity” necessity. Much like a warm cobbler, the “sauce” created by the melting ice cream needs a moment to thicken as it begins to cool slightly. This ensures the dessert stays on the spoon rather than splashing into the bowl.