Butter Toffee Pretzels
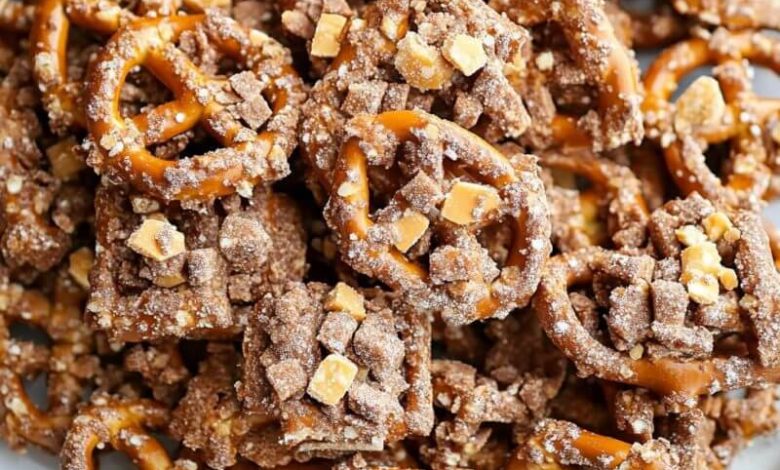
When it comes to snacks that perfectly blend sweet and salty flavors, butter toffee pretzels are in a league of their own. These crunchy delights, coated in rich caramelized toffee and sprinkled with a touch of salt, are sure to satisfy any craving. Whether you’re preparing treats for a holiday gathering, need a movie night snack, or simply want to indulge in something delicious, butter toffee pretzels are a go-to choice. Not only are they easy to make, but they also store well, making them the perfect make-ahead snack. Let’s explore how to create this mouthwatering treat!
ADVERTISEMENT
Ingredients You’ll Need
Before diving into the process, it’s important to gather the necessary ingredients. Here’s what you’ll need to make a batch of these irresistible snacks:
ADVERTISEMENT
| Ingredient | Quantity |
|---|---|
| Pretzel snaps (square-shaped) | 1 (16 oz) bag |
| Butter | ⅔ cup |
| Brown sugar | 1 ¼ cup |
| Corn syrup | ⅓ cup |
| Vanilla extract | 1 teaspoon |
| Baking soda | ½ teaspoon |
| Heath bits (toffee bits) | 1 (8 oz) bag |
| Roasted peanuts (finely chopped, optional) | ¼ cup |
With just a handful of simple ingredients, you’ll have everything you need to make this delightful treat.
ADVERTISEMENT
Step-by-Step Recipe for Perfect Butter Toffee Pretzels
Step 1: Preparing Your Workspace
Start by preheating your oven to 200°F (93°C). You’ll also want to line a large baking sheet with parchment paper. This will prevent the pretzels from sticking to the sheet and make cleanup much easier.
Step 2: Making the Toffee Sauce
To create the rich, buttery toffee coating, combine the butter, brown sugar, and corn syrup in a small saucepan. Cook the mixture over medium heat, stirring occasionally until it begins to boil. Once it reaches a boil, stop stirring and let the mixture bubble for 2-3 minutes. This will allow the sugar to caramelize and develop that signature deep, rich flavor of toffee.
After the mixture has boiled for a few minutes, remove the saucepan from the heat.
Step 3: Adding Baking Soda and Vanilla
Now that your toffee sauce is ready, it’s time to add in the vanilla extract and baking soda. As soon as you stir these in, the mixture will begin to bubble and foam. This reaction is critical because it aerates the toffee, giving it a light, airy texture that perfectly coats the pretzels. Be sure to stir quickly and evenly.
Step 4: Coating the Pretzels
Next, pour your pretzel snaps into a large mixing bowl. Immediately pour the warm toffee sauce over the pretzels, and toss them gently to ensure each pretzel is coated with a generous layer of toffee. You want the sauce to cover every nook and cranny of the pretzels to achieve the perfect balance of sweetness and saltiness in each bite.
Step 5: Adding the Heath Bits
Once your pretzels are thoroughly coated in toffee, sprinkle in the Heath bits. These toffee bits will add an additional layer of crunch and a burst of caramel flavor. Stir the mixture well so the Heath bits are evenly distributed throughout the batch.
Step 6: Baking for Extra Crunch
Spread the coated pretzels out evenly on your prepared baking sheet. Place the sheet in your preheated oven and bake for about 45 minutes, stirring halfway through. This slow baking process allows the toffee to set and harden, creating a crisp and crunchy coating around each pretzel.
Step 7: Adding Roasted Peanuts (Optional)
If you’re a fan of nutty flavors, now is the time to sprinkle some finely chopped roasted peanuts over the pretzels while they’re still warm from the oven. The peanuts add a layer of savory crunch that complements the sweet and salty combination of the toffee pretzels. Gently toss the pretzels and peanuts together to ensure they are well mixed.
Step 8: Cooling and Storing
Once the pretzels have baked to perfection, remove them from the oven and let them cool completely on the baking sheet. As they cool, the toffee will harden into a delightfully crunchy layer. Once fully cooled, break the pretzels into bite-sized pieces if necessary and store them in an airtight container to keep them fresh.
Butter toffee pretzels will keep for up to two weeks when stored properly, making them a perfect snack to prepare in advance for special occasions or casual munching.