White foam seeps out of my meatloaf while baking — is that normal?
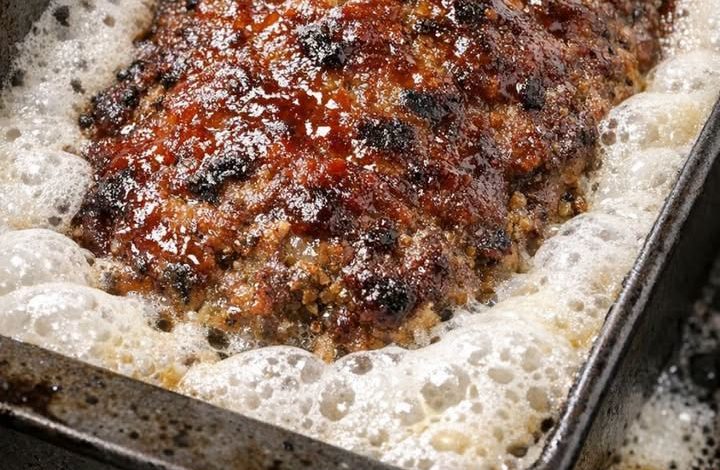
Baking a homemade meatloaf is one of the most comforting and rewarding kitchen activities you can undertake. It fills your entire home with a wonderful, savory aroma and promises a hearty, delicious meal at the end. However, as you peek through the oven window to check on your progress, you might notice something unexpected and a bit unappealing: a bright white, bubbly, foamy substance seeping out of the meat and gathering on top or around the sides.
ADVERTISEMENT
Before you assume something went wrong and consider throwing your hard work away, take a deep breath. This exact situation happens to home cooks everywhere every single day. It is a completely standard, natural part of cooking ground meat.
ADVERTISEMENT
In this detailed guide, we will break down exactly what this mysterious white substance is, the simple science behind why it shows up, and the best ways to manage, minimize, or prevent it so your final dish looks just as amazing as it tastes.
ADVERTISEMENT
1. What Exactly Is the White Foam on Your Meatloaf?
The white layer or foam that forms on your meatloaf during the baking process is mostly a combination of liquid proteins and melted fats. Ground meat contains a high amount of moisture, naturally occurring proteins, and fat pockets.
When you mix these elements together to form a loaf, those components are all sitting right next to each other. As the heat of the oven penetrates the center of the food, these fluids are forced outward. When they reach the hot surface of the meatloaf, they mix with the air and the ambient heat of the oven, turning into a frothy, white, or light-grey residue. Because ground meat has been chopped and processed, these internal proteins are much more exposed to the surface than they would be in a solid cut of meat like a steak or a roast.
2. The Simple Science: How Heat Changes Meat Proteins and Fats
To understand why this happens, it helps to look at a little bit of basic kitchen science. Meat is made up of muscle fibers that contain tightly coiled strands of protein.
-
Protein Changes: When meat is exposed to heat, these protein strands undergo a change called denaturation. They begin to unwind, relax, and then clump back together in a process called coagulation. As they tighten up, they squeeze out the excess water and soluble proteins trapped inside the muscle cells. This protein-rich liquid travels to the cooler surface of the meatloaf.
-
Fat and Moisture Mixing: At the exact same time, the solid fat within your meat blend begins to melt into a liquid. When this liquid fat meets the escaping water and protein, they mix together rapidly. The bubbling action of the heat creates a temporary blend, which shows up on your dinner as a thick, white foam. It is very similar to the frothy layer or “scum” that floats to the top of the pot when you simmer chicken bones or beef pieces to make a homemade soup or broth.
3. Is the White Foam Safe to Eat?
The short answer is yes, it is completely safe to eat. The white foam is not a sign of bad meat, poor quality, or spoilage. It consists entirely of edible proteins and fats that were already inside the meat when you bought it. It is the exact same type of protein as the white substance (called albumin) that often leaks out of a piece of baked salmon.
While it might not look very pretty or professional, eating it will not harm you or alter the safety of your meal. However, you should always practice standard kitchen awareness. If your raw meat had an unusual or sour smell before cooking, or if the foam itself has an odd odor that doesn’t smell like cooked beef, you should rely on your basic judgment regarding food freshness.
4. How Meat Varieties and Fat Ratios Change the Outcome
The specific blend of meat you buy at the grocery store has a massive impact on how much foam you will see in your oven.
-
Lean Meats: If you choose very lean options, like ground turkey breast or ground chicken, you will generally notice much less foam. This is because there is very little fat available to melt and mix with the escaping proteins.
-
Higher Fat Blends: If you prefer using traditional ground beef, ground pork, or a custom blend of various meats, you are far more likely to see a noticeable amount of foam.
A very popular choice for a juicy meatloaf is an 80/20 or 85/15 lean-to-fat ratio. This amount of fat keeps the interior incredibly tender and flavorful, but it also means there is a much higher volume of fat ready to liquefy and create foam.
5. How Binders, Eggs, and Milk Influence the Foam
Almost every traditional recipe calls for specific binding ingredients like dried breadcrumbs, crushed crackers, whole eggs, or a splash of milk. These ingredients do more than just add flavor; they actively change how the meat behaves under heat.
-
The Role of Eggs: Whole eggs introduce extra proteins into the mixture. While this can sometimes add to the overall protein content that creates foam, eggs also act as an incredible glue. They help trap the meat fibers together, which can actually prevent too much liquid from escaping in the first place.
-
The Role of Milk and Breadcrumbs: Adding a small amount of milk to breadcrumbs creates a mixture that acts like a sponge. This sponge absorbs the melting fats and releasing juices during the baking process, keeping them locked deep inside the loaf instead of letting them pool on top as foam.
6. The Impact of Your Baking Temperature and Pan Choice
The environment inside your oven plays a major role in how quickly and intensely the meat proteins react.
-
Baking Temperatures: If you bake your dish at a very high heat, the outer proteins will tighten up incredibly fast. This rapid tightening forces the internal liquids out under pressure, causing a sudden burst of heavy foaming. Cooking at a steady, moderate temperature, such as 350°F (175°C), allows the meat to cook gently and evenly, keeping foam production to a minimum.
-
Pan Selection: Baking your dinner in a deep, high-sided loaf pan keeps all the fat and moisture trapped right next to the meat, which can encourage the foam to sit on top of the crust. If you bake your meatloaf free-form on a flat baking sheet, the liquids can run away from the food. Even better, using a baking sheet lined with a dedicated wire rack allows the excess fat to drip completely down to the bottom pan, separating it from the meat entirely.
7. Easy Preparation Steps to Reduce Foam Before Cooking
If you want to stop the foam before it even starts, you can try a couple of simple preparation techniques during your meal prep.
-
Avoid Over-Mixing: When you combine your ground meat, spices, and binders together, use a incredibly gentle touch. Use your hands or a fork to mix the ingredients just until they are combined. If you over-mix or work the meat into a heavy paste, you break down the meat fibers too much. This excessive damage frees up a massive amount of protein, which will inevitably turn into foam later.
-
Pre-Cooking Specific Additions: If your recipe includes chopped onions, garlic, or celery, sauté them fully in a pan and let them cool down completely before adding them to your cold meat. This keeps you from adding extra raw moisture into the meat mixture.
8. Smart Baking Techniques for a Juicy, Foam-Free Result
You can also use smart structural methods while the meatloaf is actively inside the oven to manage the moisture levels.
-
The Foil Tent Method: Try covering your meatloaf loosely with a piece of aluminum foil for the first 30 to 40 minutes of baking. This traps a gentle layer of steam around the meat, allowing the internal temperature to rise slowly and evenly. Because the heat hits the meat less aggressively, the proteins won’t tighten up as violently, resulting in a cleaner look. You can remove the foil during the last 15 minutes to let the top turn a beautiful golden brown.
-
The Gentle Water Bath: For an incredibly premium texture, you can place your loaf pan inside a larger baking dish filled with an inch of hot water. This technique creates a perfectly humid environment that keeps the meat exceptionally moist while preventing the severe temperature spikes that cause heavy foaming.
9. What to Do If You See Heavy Foaming Mid-Bake
If you look into your oven halfway through the cooking time and see a large layer of white foam, there is no need to worry. It is very easy to fix on the spot.
Simply slide the oven rack out carefully and use a large spoon, a paper towel, or a kitchen bulb baster to gently skim the white foam off the top and sides of the meatloaf. Removing this layer will not change the delicious taste or juicy texture of your final meal at all, and it will instantly make the dish look far more appetizing. If you notice a massive puddle of liquid fat accumulating in the corners of your loaf pan, you can carefully tip the pan and use a baster to remove the excess oil safely.
10. When Could White Foam Indicate an Actual Problem?
While standard white foam is normal and harmless, there are a few rare visual signs that mean you should exercise extra caution.
-
Strong Malodors: If the foam is accompanied by an intensely sour, pungent, or generally unappealing smell that does not smell like wholesome, seasoned beef, the meat may have been past its prime before baking.
-
Unusual Discoloration: Standard protein foam is always a stark white, light cream, or very pale grey color. If you ever notice foam that has a distinct green, blue, or dark yellow tint, it could indicate an issue with the ingredients or an unexpected contamination. In those rare instances, it is always safest to avoid eating the dish.
11. How to Get Clean, Picture-Perfect Slices
Once your meatloaf reaches the correct internal temperature and is fully cooked, the final step to a beautiful presentation involves patience.
-
Let the Meatloaf Rest: Never cut into a hot meatloaf the second it leaves the oven. If you slice it immediately, all the trapped juices and remaining surface foam will spill out onto your cutting board, causing the slices to crumble apart. Give the loaf at least 10 to 15 minutes to rest on your counter. This resting time allows the meat fibers to relax and reabsorb those delicious internal juices, while any lingering surface residue naturally settles.
-
Use the Right Knife: When you are ready to serve, use a very sharp, serrated knife. Use a gentle, steady sawing motion rather than pressing straight down. Wipe the blade of your knife clean with a damp paper towel between each individual slice to ensure every single portion looks incredibly neat, clean, and completely free of any unwanted film or residue.