My partner always beams with joy when this meal is in front of him…
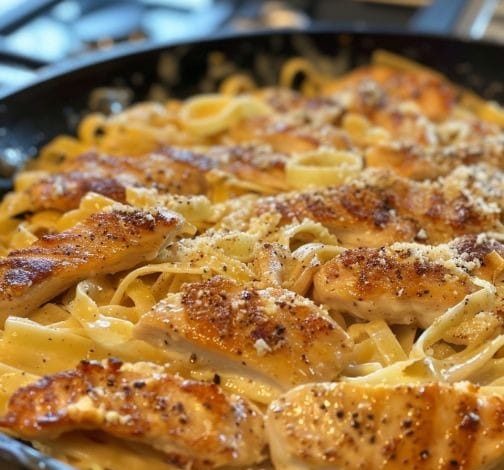
This Lemon Pepper Chicken Pasta is a creamy and flavorful dish that combines tender chicken with a bright lemon pepper sauce. It’s a quick and easy meal perfect for weeknights or any occasion.
ADVERTISEMENT
Ingredients:
| Ingredient | Quantity |
|---|---|
| Boneless, skinless chicken breasts | 2 |
| Lemon pepper seasoning | 2 tsp |
| Salt | 1/2 tsp |
| Olive oil | 2 tbsp |
| Garlic, minced | 3 cloves |
| Chicken broth | 1 cup |
| Heavy cream | 1 cup |
| Lemon zest | 1 lemon |
| Lemon juice | 1 lemon |
| Parmesan cheese, grated | 1/2 cup |
| Pasta (spaghetti, fettuccine, penne) | 12 oz |
| Fresh parsley, chopped (optional) | 2 tbsp |
| Lemon slices (optional) | For garnish |
Instructions:
- Season the Chicken: Season both sides of the chicken breasts with the lemon pepper seasoning and salt.
- Cook the Chicken: In a large skillet over medium-high heat, heat 1 tablespoon of olive oil. Add the seasoned chicken breasts and cook for 5-6 minutes per side, or until golden brown and cooked through (internal temperature of 165°F/74°C). Remove the chicken from the skillet and let it rest for a few minutes before slicing.
- Cook the Pasta: While the chicken is cooking, bring a large pot of salted water to a boil. Cook the pasta according to package instructions until al dente. Drain and set aside.
- Make the Sauce: In the same skillet used for the chicken, add the remaining tablespoon of olive oil over medium heat. Add the minced garlic and sauté for about 1 minute, until fragrant. Pour in the chicken broth and bring to a simmer. Stir in the heavy cream, lemon zest, and lemon juice. Let the sauce simmer for 3-4 minutes, until slightly thickened.
- Add the Cheese and Pasta: Stir in the grated Parmesan cheese until melted and smooth. Add the cooked pasta to the skillet and toss to coat in the creamy lemon sauce.
- Combine and Serve: Slice the cooked chicken and place it on top of the pasta. Garnish with chopped fresh parsley and lemon slices, if desired. Serve immediately.