How to Safely and Effectively Remove Stubborn Toilet Seat Stains
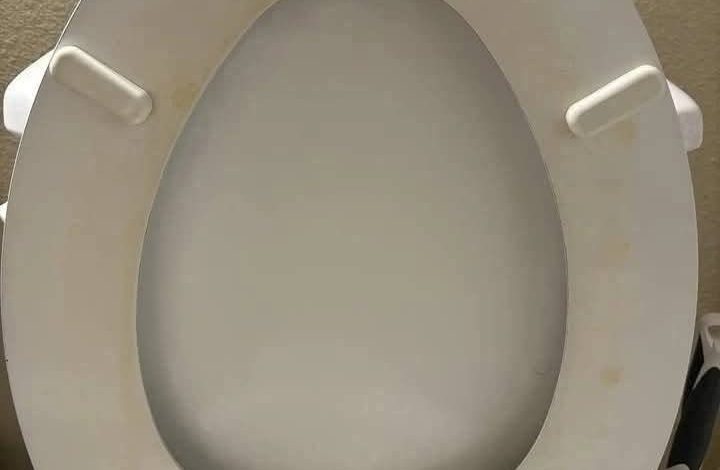
Let’s face it for just a moment—there is no worse feeling than walking into your bathroom the first time of the week, looking down, and seeing that yellowish, weirdly stubborn toilet seat stain. It is incredibly frustrating to deal with, and it can instantly make an otherwise pristine bathroom feel uninviting.
ADVERTISEMENT
I have experienced it myself too many times to count. Whether you are dealing with deep hard water marks, strange discoloration, or permanent stains left over from old cleaning routines, toilet seat stains are just the kind of thing that decides to make an unexpected appearance and stick around for the long haul.
ADVERTISEMENT
I used to be the kind of person who simply gave the toilet a quick scrub with a brush and then hoped the earth would take care of the mess on its own. However, after accommodating one too many house guests who acted like literal inspectors with respect to your toilet and its cleanliness (you know the exact kind of guests I mean, they can see everything), I realized that I had to up my game. I needed to focus on all things toilet cleanliness—not just the inside of the bowl, but the whole throne.
ADVERTISEMENT
If you are currently staring at your toilet seat thinking, “Ew, what is that?” or if you are simply looking for a definitive guide on how to really deep clean your whole toilet seat rig and everything attached to your toilet, this comprehensive guide is for you.
Below is the exact cleaning method that I have been using successfully over the years. I have also included a few strange things that I found out through a mix of curiosity, desperation, and one highly memorable bad experience involving harsh bleach and a closed bathroom door. Let’s break it down into simple, easy steps.
Why Toilet Stains Happen In The First Place
Before we jump into full scrub mode, we need to understand exactly what we are dealing with. Stains happen for a variety of reasons, and knowing the root cause makes removing them much easier.
-
Hard Water Deposits: This happens when minerals like calcium, lime, and iron exist in your water supply. When the water evaporates, it leaves a heavy residue behind. Over time, these minerals form a tight bond to plastic and porcelain surfaces, making them incredibly tough to scrub away.
-
Urine Stains: When small splashes are not wiped away promptly, the urea present in the liquid breaks down into ammonia. This chemical process can permanently discolor plastic materials and encourage bacteria to create a yellowish biofilm.
-
Mold and Mildew: Bathrooms are naturally warm and humid environments. When you combine that moisture with organic residue, fungi can thrive. They produce deeply pigmented spores that sink into surfaces and cause dark stains.
-
Everyday Grime: Daily use means a buildup of body oils, sweat, dust, skin lotions, and hair products. These oils act like a magnet for dirt, creating a thin film that traps other stains beneath it.
-
Cleaning Product Residue: Sometimes, trying too hard to clean causes issues. If harsh chemical cleaners are left on a surface or not rinsed away properly, the leftover residue can actually attract dirt and discolor plastic over time.
“Most toilet seat stains aren’t “dirt” in the traditional sense—they’re chemical reactions, mineral deposits, or microbial growth. Understanding the cause helps you choose the right solution.”
What You’ll Need: Simple Supplies That Actually Work
You do not need to spend money on a cabinet full of expensive, specialized chemical cleaners. These basic household items are safe, highly effective, and easy to find.
Essential Supplies
-
White Vinegar: This contains mild acetic acid which works wonders to dissolve tough mineral deposits. It also acts as a safe, natural antimicrobial agent. You can find it in any grocery store for a very low price.
-
Baking Soda: This acts as a very gentle abrasive powder that scrubs without scratching. It naturally deodorizes and helps lift set-in discoloration.
-
Hydrogen Peroxide (3% Concentration): This works beautifully to naturally bleach away stains and kill mold or mildew. It is much safer to breathe in than standard chlorine bleach and can be found in any pharmacy first-aid aisle.
-
Mild Dish Soap: Excellent for cutting through body oils and everyday grime without damaging delicate plastic finishes.
-
Microfiber Cloths: These lint-free cloths are fantastic for trapping dirt particles and are completely gentle on smooth surfaces.
-
Soft-Bristled Brush: An old toothbrush is perfect for this. It allows you to reach deep into hinges, tight crevices, and textured surfaces.
-
Rubbing Alcohol (Optional): This is great for disinfecting surfaces quickly, evaporating without leaving streaks, and removing sticky adhesive residue.
Materials and Methods to Avoid
-
❌ Abrasive Scrubbers: Avoid steel wool or harsh green scouring pads. These will leave microscopic scratches on plastic seats, creating the perfect hidden hiding spots for future stains and bacteria to grow.
-
❌ Chlorine Bleach on Plastic: Avoid using straight bleach on plastic parts. Over time, it can cause severe yellowing, weaken the integrity of the material, or cause the seat to crack.
-
❌ Mixing Cleaners: Never combine different cleaning products together. Mixing bleach with vinegar or ammonia creates highly toxic, dangerous fumes.
-
❌ Boiling Hot Water: Do not use boiling water on plastic toilet seats, as the high heat can warp or permanently damage the material shape.
“Always ventilate your bathroom when cleaning. Open a window or run the exhaust fan. Wear gloves if you have sensitive skin.”
Step-by-Step: How to Remove Toilet Seat Stains For Real
Follow these phases to clean your toilet seat safely. You can adjust the times based on how stubborn your specific stains are.
Phase 1: Prep and Protect
-
Ventilate the room: Make sure your bathroom window is open wide or your exhaust fan is turned on high to keep fresh air moving.
-
Put on cleaning gloves: This keeps your hands completely safe from bacteria and prevents your skin from drying out from the cleaning agents.
-
Remove the seat if possible: Most modern toilet seats can be lifted off completely with a quick twist or by unscrewing the back hinges. Cleaning the seat separate from the toilet bowl makes it much easier to reach every single angle.
-
Wipe away loose surface debris: Take a damp microfiber cloth and do a quick initial pass to remove surface dust, loose hair, or fresh grime.
Phase 2: Treat the Specific Stain
-
For Hard Water and Mineral Stains (The Vinegar Soak Method): Thoroughly soak a clean microfiber cloth or a few paper towels in pure white vinegar. Lay the wet cloth directly over the stained areas and let it sit undisturbed for 15/30 minutes so the acid can break down the minerals. Afterward, sprinkle a bit of baking soda on top and scrub gently with your soft brush. Rinse it completely with clean water.
-
For Urine and Yellow Stains (The Peroxide Paste Method): Mix a simple cleaning paste using 2 tablespoons of baking soda and 1 tablespoon of hydrogen peroxide. Spread this paste evenly over the yellowed areas and let it sit for 10/15 minutes. Take your soft brush, scrub the area in gentle circles, and rinse well with water.
-
For Mold and Mildew Stains (The Spray Method): Spray undiluted white vinegar or 3% hydrogen peroxide directly onto the affected areas. Let the liquid sit for 10 minutes to completely kill the spores. Scrub well with your old toothbrush, then rinse and dry the surface thoroughly.
-
For General Grime and Oil Buildup (The Dish Soap Method): Mix a few drops of mild dish soap into a bowl of warm water. Dip your microfiber cloth into the soapy water and wipe down the entire seat surface, paying extra close attention to the hinges and the underside. Rinse off the soap with a clean, damp cloth.
-
For Stubborn, Heavily Set-In Stains (The Combo Method): Dampen the toilet seat slightly and sprinkle a generous amount of baking soda over the stains. Spray white vinegar directly on top of the powder to trigger a safe, fizzing chemical reaction. Let it bubble for 5/10 minutes to lift the deep dirt, scrub gently, and rinse thoroughly. Repeat the process a second time if necessary.
Phase 3: Rinse, Dry, and Reassemble
-
Rinse thoroughly: Use a fresh cloth dampened with plain water to wipe away absolutely all remaining cleaning residue. Leftover vinegar or peroxide film can actually attract fresh dirt if left behind.
-
Dry the seat completely: Use a completely dry microfiber cloth to wipe down all surfaces. This prevents water spots from forming and stops mold from growing back in the damp corners.
-
Reattach your toilet seat: If you removed the seat earlier, pop it back into place and secure the screws. Double-check that the hinges are moving smoothly.
-
Perform a final wipe: Give the rest of your toilet setup—including the bowl rim, the tank, and the base—a quick final wipe down to keep everything looking uniform and fresh.
“For plastic seats, always test a small, hidden area first with any new cleaner. Some plastics are more sensitive than others.”
Prevention: Keep Your Toilet Seat Stain-Free
Deep cleaning is great, but preventing the stains from ever returning in the first place is even better. Incorporating a few simple habits into your routine will save you a lot of scrubbing later.
Daily and Weekly Habits
-
Wipe splashes immediately: Doing a quick wipe when splashes happen prevents urine from drying out, concentrating, and permanently discoloring the plastic.
-
Quick weekly wipe-downs: Spend just 30 seconds once a week wiping down the seat with a cloth dampened with a little bit of white vinegar to stop mineral buildup in its tracks.
-
Keep your bathroom well-ventilated: Always run your exhaust fan during and after taking hot showers. This drastically reduces the ambient humidity levels and stops mold from finding a home.
-
Use a toilet seat cover: While entirely optional, using disposable covers adds a great protective barrier. If you prefer washable fabric covers, make sure to launder them on a highly regular schedule.
-
Check the hidden hinges and undersides: Stains love to hide away in dark crevices. Make sure you actively include the underside of the seat and the hinge mechanics in your regular cleaning routine.
Monthly Deep Maintenance
-
Remove the seat completely once a month: Even if your seat looks clean from the top, mineral deposits and body oils slowly accumulate inside the tiny gaps of the hinges. Taking it off allows for a true deep clean.
-
Inspect the material for wear: Take a close look at the plastic. If it is severely cracked or covered in deep physical scratches, it will trap stains and bacteria easily. If it is badly damaged, it might be time to replace the seat entirely.
-
Clean the surrounding bathroom areas: Regularly wipe down the exterior toilet tank, the porcelain base, and the bathroom floor surrounding the toilet. This reduces the total amount of grime that gets transferred back and forth.
Product Choices That Make a Difference
-
pH-Neutral Cleaners: These are much gentler on plastic formulas, meaning they are far less likely to cause chemical discoloration over time.
-
Microfiber Cloths Over Paper Towels: Microfiber is completely reusable, vastly more effective at trapping microscopic dirt particles, and creates far less household waste.
-
Natural Cleaning Alternatives: Relying on simple ingredients like vinegar and baking soda keeps your surfaces intact and is much easier on your lungs than heavy chemical sprays.
“If you have hard water, consider a water softener for your home or use a vinegar rinse on bathroom fixtures weekly to prevent mineral buildup.”
Safety First: What NOT to Do When Cleaning Toilets
Sometimes, well-intentioned cleaning choices can end up causing more harm than good. Keep these critical safety guidelines in mind to protect your home and your health.
-
Never Mix Bleach With Other Chemicals: Mixing chlorine bleach with white vinegar or ammonia creates highly hazardous chlorine or chloramine gases. Breathing this in can cause immediate respiratory distress. Stick to using one single cleaner at a time, keep the room ventilated, and never mix products.
-
Avoid Abrasive Pads on Soft Plastic: Using rough pads creates microscopic grooves on smooth plastic surfaces. These tiny scratches act as a permanent magnet where stains and dangerous bacteria can hide away from future cleanings. Stick to soft cloths or soft-bristled toothbrushes.
-
Do Not Spray Cleaners Directly Into Hinges: Spraying liquids directly onto the metal or plastic hinge mechanisms can cause moisture to seep deep inside, leading to metal rust or loose screws. Instead, spray your cleaner onto a microfiber cloth first, then use the damp cloth to wipe the hinges safely.
-
Do Not Leave Cleaners to Soak For Too Long: Leaving acidic or strong mixtures to sit on your toilet seat for hours can permanently ruin the shiny finish of the plastic or porcelain. A quick soak of 10/15 minutes is usually more than enough time to break down tough stains.
-
Never Skip the Final Rinse Step: Leaving leftover cleaning residue on the toilet seat can cause skin irritation upon contact, attract new dust particles, and cause the plastic material to discolor over time. Always finish up your cleaning routine by wiping the entire area down with fresh, clean water.
“If you accidentally mix chemicals and experience coughing, burning eyes, or difficulty breathing, leave the area immediately, get fresh air, and call Poison Control (1-800-222-1222 in the U.S.) or emergency services.”