Almost all freezers have this “secret” element. That’s why it needs to be used once every 3 months

In the hustle and bustle of daily life, it’s easy to overlook the maintenance needs of household appliances, especially those that seem to function perfectly fine without much attention. However, when it comes to freezers, there’s a “secret” element that often goes unnoticed yet plays a crucial role in ensuring the proper functioning of these appliances. In this article, we delve into the significance of this often overlooked component and why it’s essential to utilize it periodically.
ADVERTISEMENT
The Hidden Component: A Closer Look
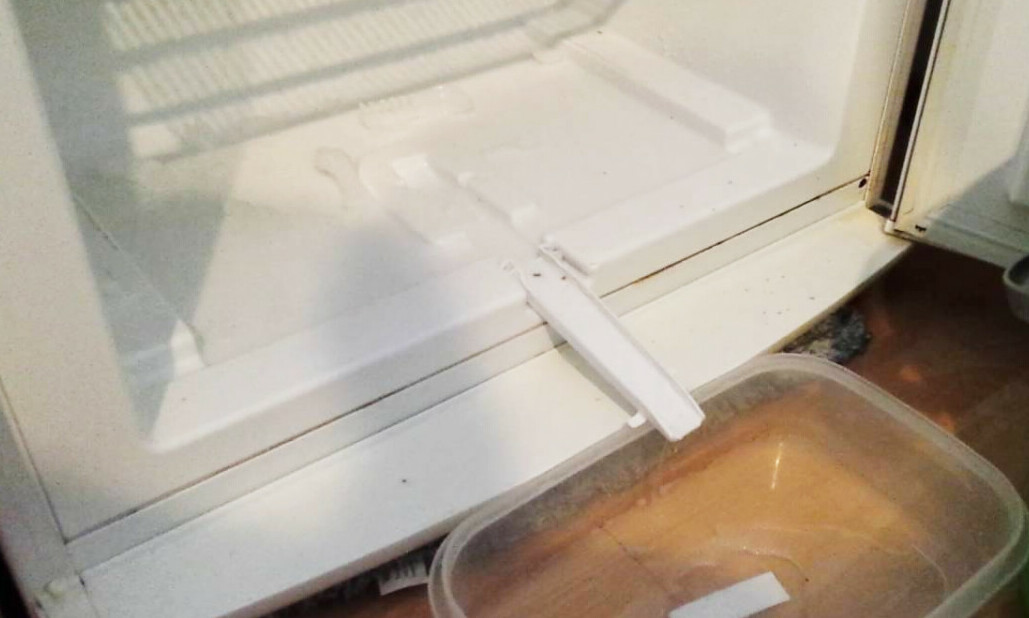
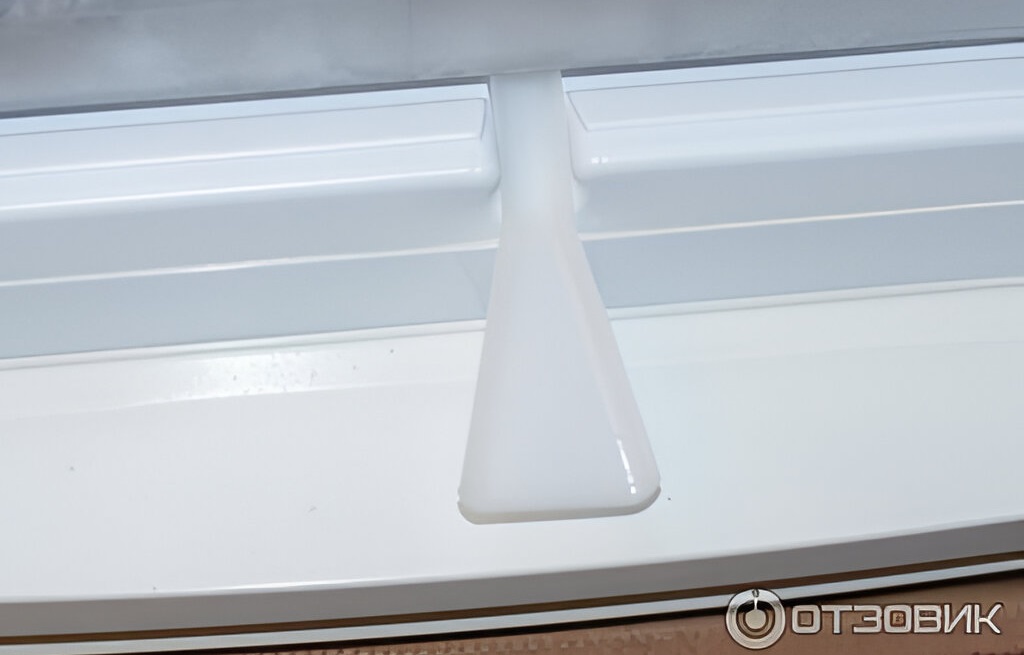
Take a moment to inspect your freezer closely. You might discover a seemingly inconspicuous valve or funnel located at the bottom. The appearance and placement of this component vary depending on the model of your refrigerator, leading many individuals to overlook its presence altogether. In some cases, this element may be concealed or obstructed, requiring the removal of the bottom drawer for access.
ADVERTISEMENT
Understanding Its Purpose
Contrary to its discreet appearance, this component serves a vital function during the defrosting process. It acts as an outlet for draining excess water that accumulates during defrosting, ensuring the efficient removal of ice buildup within the freezer compartment.
ADVERTISEMENT
Proper Defrosting Techniques
To maintain the optimal performance of your freezer, it’s essential to adhere to proper defrosting procedures. Begin by emptying all shelves and opening the freezer door. Next, unplug the appliance to halt its operation temporarily. Subsequently, locate and open the valve or position a specialized spatula on the funnel, facilitating the drainage of melted ice.
Instructions:
- Empty the Freezer: Begin by removing all items from your freezer and placing them in a cooler or another suitable storage space.
- Turn Off the Freezer: Locate the power cord of your freezer and unplug it from the electrical outlet to ensure safety during the defrosting process.
- Open the Freezer Door: Fully open the door of the freezer to allow air to circulate freely and facilitate the melting of ice.
- Prepare a Drainage Container: Place a shallow container, such as a bowl or baking tray, beneath the drainage valve or funnel located at the bottom of the freezer. Ensure the container is large enough to hold the melted ice.
- Remove Ice Buildup: If there is excessive ice buildup on the walls or shelves of the freezer, gently chip away at it using a plastic scraper or spatula. Avoid using sharp objects that could damage the interior of the freezer.
- Wait for the Ice to Melt: Allow the ice to naturally melt away at room temperature. This process may take several hours, depending on the amount of ice accumulated.
- Dispose of Melted Water: Periodically check the drainage container to ensure it does not overflow. Once the ice has completely melted, carefully dispose of the collected water.
- Clean the Freezer: Once the defrosting process is complete and the interior of the freezer is free from ice, use a mild detergent solution and a clean cloth to wipe down the surfaces and remove any remaining residue.
- Dry the Interior: Thoroughly dry the interior of the freezer using a towel or paper towels to prevent the formation of new ice.
- Plug In the Freezer: After ensuring that the interior is completely dry, plug the freezer back into the electrical outlet and close the door.
Watch step by step with photos below:
1.
2.