My mother-in-law taught me this trick to lift stubborn orange tomato stains out of plastic food containers with 0 effort. Here’s how it works
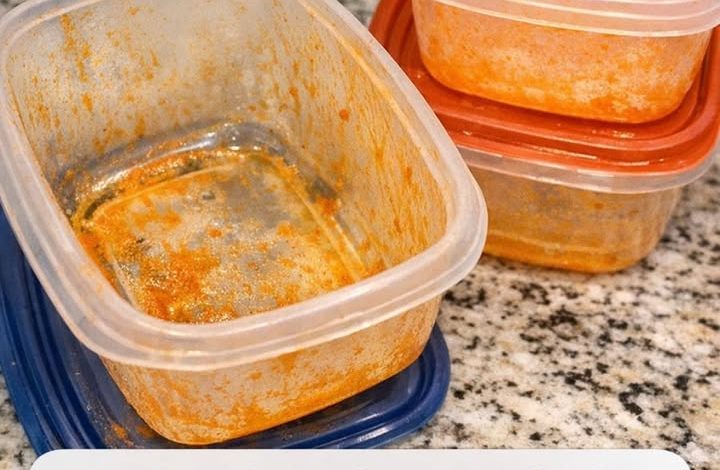
We have absolutely all been there: you open your kitchen cupboard to grab your favorite, perfectly sized plastic food container, only to find it permanently tainted with an unappetizing, cloudy orange hue. Whether it is from last week’s hearty batch of spaghetti sauce, a deliciously rich curry, or leftover chili, it is a common household dilemma. Honestly, it can leave even the most diligent and enthusiastic cleaner feeling entirely defeated. You scrub and scrub, but the plastic just looks dirty.
ADVERTISEMENT
But fear not, because there actually exists a wonderfully simple, effortless trick that can lift those stubborn stains without the need for abrasive scrubbing, exhausting elbow grease, or harsh, toxic chemicals.
ADVERTISEMENT
My mother-in-law, a seasoned expert in absolutely all things household and cleaning, shared this completely ingenious method with me. I can say firsthand that it has transformed the way I approach cleaning my kitchen. This trick not only saves you precious time, but it also preserves the integrity of the plastic, ensuring your storage containers remain looking as good as new. Read on to discover exactly how this incredibly easy solution can work everyday wonders for your kitchenware!
ADVERTISEMENT
1. Why Plastic Containers Turn That Stubborn Orange
Have you ever wondered why these stains are so hard to wash away? The persistent orange stains that passionately cling to our plastic containers are primarily caused by the bright, natural pigments found in tomatoes, which are known as lycopene.
To put it simply, these pigments are lipid-soluble. This means they are naturally drawn to and adhere strongly to the greasy, slightly porous surfaces of plastic containers, which tend to absorb food oils over time. This frustrating bonding process is heavily exacerbated by heating your food in the microwave. When you heat up that leftover pasta, the heat essentially bakes and bonds those tomato pigments directly into the container’s surface.
Plastics—particularly those that are older, slightly scratched, or highly porous—provide a perfect, cozy surface for these pigments to lodge into permanently. The microscopic crevices trap the cooking oils and the bright red/orange colors, making it near impossible to remove them through conventional dish soap and washing methods. Understanding this scientific little process is the key to learning how to effectively remove these stains once and for all.
2. The Zero-Effort Trick My Mother-In-Law Swears By
You might think you need industrial bleach, but the secret actually lies in utilizing the natural bleaching power of sunlight combined with the gentle, lifting action of basic household ingredients. My mother-in-law’s trick involves creating a very simple solution that can literally be left alone to work its magic without any additional physical effort on your part.
This method smartly harnesses the potent, natural combination of bright sunlight and a basic homemade cleaning agent to lift the stains right out of the plastic without any heavy scrubbing.
She absolutely swears by the use of baking soda, which acts as a fantastic mild abrasive, and the natural, grease-cutting acidity of fresh lemon juice, which helps rapidly break down the trapped oils and stubborn pigments. This dynamic duo, when actively combined with the sun’s warm rays, makes for an absolutely unbeatable stain-lifting team.
3. What You Need: Simple Ingredients You Already Have
The true beauty of this method is its ultimate simplicity and easy accessibility. You do not need to run out and buy expensive, specialized plastic cleaners.
Here is your simple checklist:
-
One tablespoon of plain baking soda
-
The freshly squeezed juice of half a lemon
-
A little bit of warm tap water
-
A bright, sunny spot in your home or yard
These common, everyday household items are more than likely already sitting right in your pantry or fridge. By using what you have, you are completely eliminating the need for a stressful trip to the grocery store or the purchase of expensive, chemical-heavy cleaning products. This straightforward list makes the entire process not only incredibly easy but also wonderfully cost-effective for your household budget.
4. Step-By-Step: How To Prep the Stained Container
Now that you have your supplies ready, it is time to get started.
Follow these easy prep steps:
-
Begin by thoroughly rinsing the stained container with warm water to wash away any loose debris, grease, or leftover food particles. This crucial first step ensures that your homemade cleaning solution can directly contact the deep stains without any physical barriers blocking the way.
-
Next, grab a small bowl and mix the tablespoon of baking soda with just enough water to form a thick, spreadable paste. Think of a toothpaste-like consistency.
-
Generously apply this thick paste directly to the stained areas of the container. Ensure you have full, thick coverage over every single orange spot.
-
Finally, squeeze the fresh juice of half a lemon directly over the baking soda paste.
A Quick Note: Don’t be startled when it starts to bubble! Allow it to fizz and foam slightly, as this active reaction with the baking soda is exactly what begins lifting the grease.
5. The Set-It-and-Forget-It Soak That Does All the Work
This is where the “zero-effort” part truly shines. Once your plastic container is properly prepped and coated with the fizzing baking soda and lemon juice mixture, it is time to let nature take over.
Carefully place the container in a very sunny spot. A bright kitchen windowsill, a sunroom floor, or even an outdoor patio table works beautifully. The sun’s powerful, natural UV bleaching properties will dramatically enhance the stain-removing power of your lemon and baking soda paste.
Leave the container to soak peacefully in the sunlight. This hands-off, set-it-and-forget-it approach allows the acidic and abrasive solution to gently but effectively penetrate the stains deeply. It naturally breaks them down over time without requiring any further scrubbing or effort on your part. You can go read a book, watch a movie, or run errands while the sun does the heavy lifting!
6. How Long To Leave It So the Orange Cast Completely Lifts
Patience is key here. For the most optimal and satisfying results, it is highly recommended to leave the coated container sitting in the direct sun for a minimum of 4 hours.
However, if the tomato stains are particularly dark, old, or stubborn, you may want to seriously consider extending the soaking time. Letting it sit for 6 to 8 hours, or even leaving it out for a full, sunny day, will yield much better results for deeply embedded stains.
The total duration you choose will heavily depend on two things: the intensity of the orange stains and the direct strength of the sunlight on that particular day. The longer the UV exposure, the more effective the stain removal will be. So, please do not hesitate to let it soak for an entire lazy afternoon if needed!
7. Rinsing, Drying, and Seeing the Before-and-After Difference
The waiting is over, and now it is time for the big reveal! After your chosen soaking period has passed, bring the container back inside to the kitchen sink and rinse it thoroughly with warm, running water.
Grab a standard, soft kitchen sponge to gently wipe away and remove any remaining, dried residue from the baking soda paste. Because the sun and lemon juice did the hard work, you won’t need to scrub hard at all.
Once it is completely rinsed, dry the container with a clean, soft dish towel and take a moment to marvel at the transformation. The cloudy, orange stains should be noticeably lighter, or in most cases, completely gone! This easy process beautifully restores your food container to its original, crystal-clear cleanliness.
8. Extra-Stubborn Stains: When To Repeat or Tweak the Trick
While this trick works like magic the first time for most items, in some extreme cases, particularly stubborn or years-old stains may require a second round of treatment.
If you dry your container and find that a faint orange tint still sadly remains, do not give up. Simply repeat the exact same process, applying a fresh, new batch of the baking soda and lemon juice paste, and finding that sunny spot once more.
Alternatively, consider tweaking the recipe by adding a small splash of plain white vinegar to the mixture for an added, supercharged boost in stain-fighting power. The strong, natural acidity of white vinegar can further enhance the breakdown of those stubborn residual pigments, providing an extra level of deep-cleaning action.
9. Safety Tips for Food Containers and When To Toss Them
While this cleaning method is wonderfully gentle and effective, it is also incredibly important to regularly inspect all of your plastic containers for general signs of wear and tear.
Deep knife scratches, peeling plastic, and structural cracks can unfortunately harbor dangerous foodborne bacteria and severely compromise the container’s safety and integrity.
If a plastic container is heavily scratched, warped from the dishwasher, or has a lingering, unpleasant odor that simply won’t dissipate even after washing, it may sadly be time to retire it. Always prioritize your family’s food safety by ensuring your storage containers are in pristine, safe condition before using them for storing your precious leftovers.
10. Easy Preventive Habits So Stains Don’t Come Back
Now that your containers are looking brand new again, let’s talk about keeping them that way! To prevent future stains from ruining your day, consider adopting a few incredibly simple kitchen habits.
Pro-tips for stain prevention:
-
Always rinse your dirty containers promptly with cold water immediately after use. Cold water prevents the greasy pigments from setting into the plastic.
-
Avoid microwaving any tomato-based foods (like chili or spaghetti) directly in plastic containers, as the high heat will instantly exacerbate staining. Transfer the food to a microwave-safe ceramic bowl first.
-
Consider lightly spraying the inside of your container with a tiny bit of non-stick cooking spray before adding tomato sauces; this creates a protective barrier.
-
Try lining your containers with a small sheet of parchment paper, or slowly transition to using glass container alternatives for highly pigmented foods.
These small changes can help maintain their pristine condition, greatly reducing the need for frequent, deep-cleaning interventions.
11. Other Everyday Items This Trick Works On Too
The absolute best part about this versatile cleaning method is that it isn’t just exclusively for your plastic food containers. You can easily apply these exact same scientific principles to a wide variety of other household items plagued by stubborn, greasy stains.
Try using this exact paste and sunlight method on your plastic or wooden cutting boards, especially those that are frequently used for chopping fresh tomatoes, bright berries, or other highly acidic, colorful foods.
It can also be wonderfully effective on stained silicone kitchen utensils, rubber spatulas, or even dingy, stained kitchen dish towels. The natural, chemical-free cleaning power of baking soda and fresh lemon juice, perfectly combined with warm sunlight, offers a gentle yet highly effective solution for a whole range of everyday cleaning challenges around your home.