Rub this 1 trick on your nails and get rid of stubborn stains, yellow buildup, and rough texture
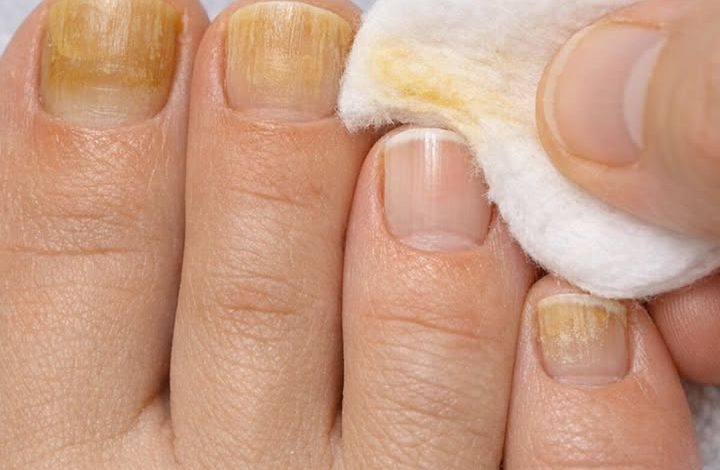
Nail care is a vital part of our daily grooming and personal hygiene routines. Even so, it is incredibly easy to overlook our hands until we suddenly notice dark stains, a yellow tint, or a rough texture.
ADVERTISEMENT
Our nails go through a lot of wear and tear every single day. Frequent use of dark nail polish, exposure to strong cleaning chemicals, and daily chores can leave the surface looking dull and discolored.
ADVERTISEMENT
Fortunately, you do not need to spend money on expensive salon treatments to fix this issue. There is a simple, cost-effective method you can try at home to bring back the clean, healthy look of your natural nails.
ADVERTISEMENT
This guide details a straightforward household routine designed to target stubborn surface stains, yellowing, and uneven texture. Using safe, common pantry ingredients, this method offers great results with very little effort.
1. Why Your Nails Turn Yellow, Stained, and Rough
To fix nail discoloration, it helps to understand exactly why it happens in the first place. There are a few everyday factors that change the look and feel of your nail plates:
-
Dark Nail Polishes: Frequently applying dark nail polishes without a protective base coat is a leading cause of yellowing. The strong dyes and pigments in these polishes can seep into the top layers of the nail over time.
-
Environmental Exposure: Regular contact with household cleaning products, smoke, or certain chemical agents can gradually stain the nail surface.
-
Dehydration and Dryness: Rough textures and ridges often happen when your nails lose their natural moisture. When the nail plate dries out, it becomes brittle, prone to peeling, and uneven.
Recognizing these simple causes makes it much easier to treat the stains and protect your hands from future damage.
2. The Simple Rubbing Routine for Brighter Nails
Skin and beauty experts frequently suggest a simple, natural mixture of baking soda and hydrogen peroxide to clear up superficial nail stains. Both of these everyday household items have unique properties that work well together:
-
Baking Soda: This common powder acts as a very mild, gentle abrasive. It helps safely scrub away surface stains and smooths down rough edges without scratching the nail.
-
Hydrogen Peroxide: Known as a mild, natural brightening agent, it works to lift deeper discoloration and refresh the look of the nail plate.
When you mix these two ingredients together, they form a thick paste. Massaging this paste onto your hands creates an easy, budget-friendly remedy that you can safely use in the comfort of your own home.
3. How to Mix the Stain-Removing Paste
You only need a few basic items from your kitchen or medicine cabinet to create this mixture.
What You Need:
-
2 tablespoons of baking soda
-
1 tablespoon of hydrogen peroxide (standard 3% concentration)
-
A small glass or plastic mixing bowl
-
A spoon or stirring stick
Mixing Instructions:
Measure the baking soda and pour it into your small mixing bowl. Gently add the hydrogen peroxide to the powder. Stir the two ingredients together thoroughly until the bubbling settles and they form a smooth, thick, spreadable paste. If the mixture feels too runny, add a tiny pinch of baking soda. If it is too thick, add a few drops of hydrogen peroxide until the consistency is just right.
4. Step-by-Step Application Guide
To get the best results from this home remedy, follow these simple steps to apply the paste correctly:
-
Wash Your Hands: Clean your hands thoroughly with warm water and mild soap to remove any surface dirt, lotions, or natural oils from your nails.
-
Apply the Paste: Use a clean, soft toothbrush or your fingertips to scoop up a generous amount of the mixture. Place a thick layer onto each individual nail.
-
Massage Gently: Rub the paste into the nail plate using soft, circular motions. Give extra attention to the areas with the deepest yellowing or the roughest texture.
-
Cover the Edges: Make sure to coat the entire surface, including the sides and tips of the nails, to ensure an even, uniform look. Spend about 5 minutes treating each hand.
5. Timing for Maximum Brightening
Once you finish massaging the paste into your nails, leave the mixture on your hands to rest.
Important Timing Tip: Let the paste sit undisturbed on your nails for 5 to 10 minutes. This gives the ingredients enough time to break down surface stains and soften rough spots.
Do not leave the mixture on for longer than 10 minutes. Because hydrogen peroxide can draw away moisture, leaving it on too long might dry out your cuticles and nails. It is a good idea to set a timer on your phone so you can easily track the exact time.
6. How to Buff Away Rough Textures Safely
After the waiting time is up, you can move on to smoothing out the texture of your nails:
-
Rinse Thoroughly: Wash the paste completely off your hands using plenty of lukewarm water, making sure no leftover mixture remains around your cuticles.
-
Dry Completely: Pat your hands and nails entirely dry with a clean towel.
-
Buff Gently: Take a soft cosmetic nail buffer and lightly glide it across the surface of each nail. Always work in one steady direction rather than sawing back and forth, as rubbing in multiple directions can cause tiny splits.
-
Be Gentle: Apply very light pressure. Buffing should only be done once a week at most to keep the surface smooth without thinning out or weakening the natural nail.
7. What Results to Expect After One Use
This simple treatment provides immediate, visible improvements. Right after your first session, you should notice that your nails look brighter, cleaner, and refreshed. Surface stains from old polish or daily grime will appear significantly lighter.
In addition to looking cleaner, the surface of your nails will feel much smoother to the touch. While a single application gives a noticeable boost, sticking to a regular routine will gradually fade deeper stains and keep your nails looking healthy over time.
8. How Often to Use This Method
The ideal schedule for this routine depends on the condition of your hands:
-
For Stubborn Stains: If your nails have deep yellowing or very rough ridges, repeat this treatment once every week. This schedule allows your nails to brighten safely without drying out.
-
For General Maintenance: Once your nails return to their natural, clean color, you can reduce the routine to once every two weeks. This is enough to keep new stains from building up.
9. Common Mistakes to Avoid
To protect the health of your hands, keep these important safety rules in mind:
-
Avoid Harsh Tools: Never use metal scrapers, sharp files, or rough tools to scrape away stains. Doing so can scratch the protective layer of the nail and cause permanent damage to the nail bed.
-
Do Not Overuse: Do not apply this baking soda paste more than twice a week. Overusing whitening treatments can strip away natural oils, leading to peeling, cracking, and brittle edges.
10. Protection for Sensitive Skin
If you have sensitive skin or allergies, it is important to be cautious before applying any new mixture to your hands.
Always perform a quick patch test. Rub a tiny dab of the mixed paste onto a small area of skin, such as the inside of your wrist, and wait 24 hours. Check the area for any signs of redness, itching, or irritation.
If your skin reacts poorly, you can easily alter the recipe. Try diluting the hydrogen peroxide with an equal amount of plain water before mixing it with the baking soda, or simply reduce the application time to just a few minutes.
11. Extra Daily Habits for Healthy, Shiny Nails
To keep your nails clear, smooth, and beautiful between treatments, consider adding these easy habits to your weekly routine:
-
Hydrate Regularly: Apply a nourishing oil, such as pure jojoba oil, almond oil, or standard cuticle cream, to your nails and fingers every evening. This locks in moisture and prevents cracking.
-
Protect Your Hands: Wear protective rubber gloves whenever you wash dishes, clean the house, or handle household chemicals. This shields your hands from harsh ingredients and prevents excessive water exposure, keeping your nails strong and shiny.