Toss raw baby red potatoes in the slow cooker and 3 other simple items to get a meal so delicious your family will be begging for more this Easter.
This 4-Ingredient Slow Cooker Amish Farmhouse Potatoes recipe is an exceptional masterclass in intercellular starch swelling and thermal lipid-lactic emulsion binding. Leaving the thin skins on baby red potatoes creates an engineered barrier that locks in the tuber’s natural starches and cell moisture during the braise. When dolloped with sour cream and pieces of salted butter, a heavy fat-blanket envelopes the potatoes. As the slow cooker ramps up its thermal energy, the escaping potato moisture combines with the melting dairy lipids. The final gentle stir intentionally breaks open a few potato walls, releasing free amylose and amylopectin starches directly into the pan liquid, instantly binding and thickening the running fats into a velvety, clinging farmhouse gravy.
ADVERTISEMENT
4-Ingredient Slow Cooker Amish Farmhouse Potatoes
Ingredients:
| Ingredient | Quantity |
| Baby red potatoes (unpeeled, whole or halved) | 2 1/2 / lbs |
| Sour cream | 1 / cup |
| Salted butter (cut into small pieces) | 1/2 / cup |
| Salt (plus more to taste) | 1 1/2 / tsp |
Step-by-Step Directions:
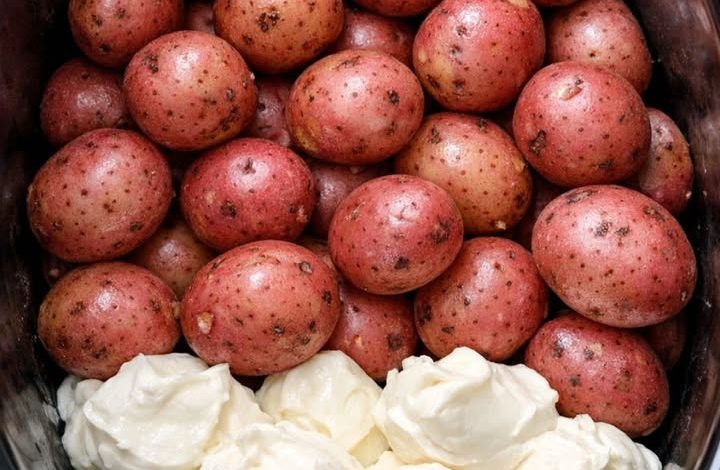
Step 1: The Basal Starch Alignment: Lightly coat the interior walls of a 4 / to 6 / quart slow cooker with nonstick cooking spray or a thin pat of butter. Rinse your baby red potatoes thoroughly and pat them completely dry with a towel, leaving the skins fully intact. Slice any exceptionally large tubers cleanly in half to ensure a uniform size profile. Arrange the raw potatoes flat along the floor of the crock.
ADVERTISEMENT
Step 2: The Lactic Saline Dollop: In a small mixing bowl, stir the sour cream and salt together until the crystals are evenly distributed through the dairy matrix. Using a large spoon, drop generous dollops of this seasoned cream over and around the potato layer, letting the white pockets settle down into the perimeter gaps.
ADVERTISEMENT
Tip: Leaving the sour cream in thick, isolated dollops rather than aggressively stirring it into a flat liquid pool at the start is a vital structural mechanic. Red potatoes need a high-humidity zone to soften. Keeping the sour cream grouped in mounds prevents its delicate proteins from breaking down and curdling on the bare, hot ceramic floor before the potatoes release their natural cooking vapors.
Step 3: The Scattered Lipid Dotting: Scatter the pieces of salted butter evenly across the tops of the potatoes and sour cream dollops, creating a uniform, geometric grid of fat blocks that will melt downward into a cohesive glaze as the temperature climbs.
Step 4: The Low-Velocity Thermal Braise: Lock the slow cooker lid firmly into its tracking groove. Program the heating unit to LOW for 4 / to 5 / hours (or HIGH for 2 / to 3 / hours). The potatoes are ready the exact moment a fork slides effortlessly through the dense center core of the largest tuber.
Tip: Do not lift the cooker lid to peek or check the potatoes during the first 90 / minutes of the cycle. A slow cooker must build and trap a pressurized, high-moisture steam vault to hydrate and gelatinize raw potato starches. Cracking the seal vents this critical energy envelope, dropping the internal heat and adding an extra 15 / to 20 / minutes to your total required cooking window per instance.
Step 5: The Starch-Shedding Thickening Emulsion: Once tender, use a wide wooden spoon or silicone spatula to gently turn the potatoes over from the bottom of the crock, coating them completely in the warm butter and cream pools. Aggressively press down on just 3 / to 4 / potato pieces against the wall of the crock to intentionally smash them into the liquid.
Note: Watch the loose, broken potato flakes instantly dissolve into the running fat pools, acting as a natural culinary binder that thickens the separated cream and butter into a rich, uniform, and opaque gravy coat.
Step 6: The Viscosity Cling Rest: Taste the seasoned sauce and add an extra pinch of salt if your palate requires it. Switch the slow cooker setting to WARM, replace the lid, and let the dish rest undisturbed for exactly 10 / minutes before serving.
Tip: The post-cook resting window is an efficiency-driven viscosity-locking milestone. Straight out of the high-heat cycle, the dairy fats are highly fluid; allowing the temperature to stabilize slightly forces the starch-thickened gravy to contract and set, ensuring it forms a thick, velvet jacket over the baby reds instead of running pool-like to the bottom of the serving bowl.