Banana Pudding Cheesecake Squares
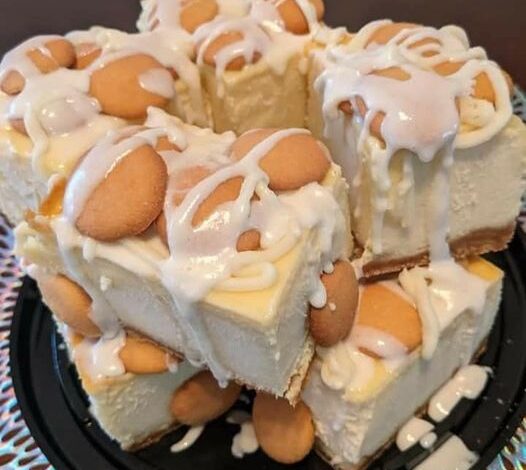
Indulge in the heavenly delight of Banana Pudding Cheesecake Squares, a delightful fusion dessert that brings together the creamy richness of cheesecake with the comforting flavors of classic banana pudding. This delectable treat is the perfect balance of sweetness and creaminess, making it an irresistible dessert option for any occasion. With a buttery vanilla wafer crust, velvety cream cheese and banana filling, and a luscious layer of banana pudding, these squares are a delightful twist on two beloved desserts. Get ready to experience the best of both worlds with this easy-to-make and crowd-pleasing dessert!
ADVERTISEMENT
Ingredients
| Ingredients | Quantity |
|---|---|
| Vanilla wafer cookies | 2 cups |
| Unsalted butter, melted | 1/2 cup |
| Cream cheese, softened | 16 oz (2 blocks) |
| Granulated sugar | 3/4 cup |
| Ripe bananas, mashed | 3 |
| Vanilla extract | 1 teaspoon |
| Lemon juice | 1 tablespoon |
| Heavy cream | 1 cup |
| Banana pudding mix | 1 box (3.4 oz) |
| Cold milk | 1 3/4 cups |
| Whipped cream or whipped topping | For garnish |
| Sliced bananas | For garnish |
Instructions
- Preheat your oven to 350°F (175°C). Grease a 9×13-inch baking dish and set it aside.
- In a food processor or using a ziplock bag and a rolling pin, crush the vanilla wafer cookies until they form fine crumbs.
- In a medium bowl, combine the cookie crumbs with melted unsalted butter, and mix until the crumbs are evenly coated.
- Press the mixture firmly into the bottom of the prepared baking dish to form the crust.
- In a large mixing bowl, beat the softened cream cheese and granulated sugar until smooth and creamy.
- Add the mashed ripe bananas, vanilla extract, and lemon juice to the cream cheese mixture. Beat until well combined.
- In a separate bowl, whip the heavy cream until stiff peaks form.
- Gently fold the whipped cream into the cream cheese and banana mixture.
- In another bowl, prepare the banana pudding mix according to the package instructions, using cold milk.
- Pour the banana pudding over the cookie crust in the baking dish, spreading it out evenly.
- Carefully spread the cream cheese and banana mixture on top of the banana pudding layer.
- Cover the baking dish with plastic wrap and refrigerate for at least 4 hours or until the dessert sets.
- Once chilled and set, cut the Banana Pudding Cheesecake Squares into squares or bars.
- Garnish each square with a dollop of whipped cream or whipped topping and sliced bananas.
- Serve chilled and enjoy this delightful fusion of banana pudding and cheesecake flavors!
These Banana Pudding Cheesecake Squares are a crowd-pleasing dessert that will have everyone coming back for more. Whether it’s a special occasion or a casual get-together, these delicious treats are sure to be a hit!
ADVERTISEMENT
FAQs (Frequently Asked Questions)
Q: Can I use store-bought banana pudding instead of making it from scratch?
ADVERTISEMENT
Absolutely! While making banana pudding from scratch adds a homemade touch, you can use store-bought banana pudding for convenience. Simply follow the package instructions to prepare the pudding and layer it on top of the cookie crust and cream cheese filling.
Q: How long can I refrigerate the Banana Pudding Cheesecake Squares before serving?
You can refrigerate the Banana Pudding Cheesecake Squares for up to 24 hours before serving. However, it’s best to serve them within 4-6 hours of chilling to maintain the perfect texture and flavors.
Q: Can I use a different type of cookie for the crust?
Yes, you can experiment with different cookies for the crust. Graham crackers or shortbread cookies make excellent alternatives to vanilla wafer cookies and add a unique twist to the dessert.
Q: Can I freeze Banana Pudding Cheesecake Squares for later consumption?
While these squares are best enjoyed fresh, you can freeze them for up to 1-2 months. Wrap each square tightly in plastic wrap and place them in an airtight container or freezer bag. Thaw the squares in the refrigerator before serving.
Q: Can I add a layer of sliced bananas between the cream cheese filling and the banana pudding?
Certainly! If you desire more banana flavor and texture, you can add a layer of thinly sliced bananas between the cream cheese filling and the banana pudding layer. This will enhance the overall banana experience of the dessert.
Q: Can I garnish the Banana Pudding Cheesecake Squares with other toppings?
Absolutely! While whipped cream and sliced bananas are classic toppings, you can get creative with your garnishes. Chopped nuts, caramel drizzle, or even chocolate shavings can elevate the visual appeal and taste of the squares.
Q: Can I make these squares in advance for a party or gathering?
Yes, Banana Pudding Cheesecake Squares are an excellent make-ahead dessert for parties and gatherings. Prepare them a day in advance and refrigerate them until serving time for a stress-free and delicious dessert option.
Q: Can I use a different fruit instead of bananas?
While bananas are the star of this dessert, you can experiment with other fruits. Sliced strawberries, peaches, or even mixed berries can be delightful alternatives, allowing you to create your own unique fruity cheesecake squares.
Q: Is this dessert suitable for a potluck or picnic?
Absolutely! Banana Pudding Cheesecake Squares are the perfect dessert for potlucks and picnics. Cut them into squares, place them in a covered container, and keep them chilled until serving. They’re sure to be a hit among friends and family.
Q: Can I make this dessert in individual portions instead of a square dish?
Definitely! If you prefer individual servings, you can use small dessert cups or ramekins. Layer the cookie crust, cream cheese filling, and banana pudding accordingly in each cup, and garnish with your favorite toppings.
Experience the delightful combination of flavors and textures in Banana Pudding Cheesecake Squares. Whether you’re hosting a gathering or simply craving a heavenly dessert, these squares are sure to be a delightful treat for everyone. Enjoy the lusciousness of cheesecake and the nostalgia of banana pudding in each delectable bite!
